Warning: Constant DB_CHARSET already defined in /var/www/sites/os-vg.com/html/wp-config.php on line 35

Warning: Constant DB_COLLATE already defined in /var/www/sites/os-vg.com/html/wp-config.php on line 37

Warning: Cannot modify header information - headers already sent by (output started at /var/www/sites/os-vg.com/html/wp-config.php:35) in /var/www/sites/os-vg.com/html/wp-includes/feed-rss2.php on line 8
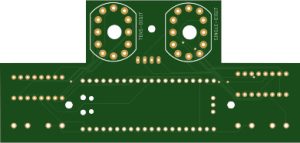
Raspberry Pico – Old School Video Games https://www.os-vg.com Where old games and systems go to retire. Tue, 25 Apr 2023 15:47:19 +0000 en-US hourly 1 https://wordpress.org/?v=6.2.14 Got the boards… https://www.os-vg.com/?p=84 Tue, 25 Apr 2023 14:42:16 +0000 http://www.os-vg.com/?p=84 From the previous post, a few things happened since then. First, the board design had to be changed. I realized that this old board design would not fit into the arcade layout and I had to modify the position of things slightly. I had to space out the Nixie tubes 2mm and that cleared a few pathways up so good a trade-off. I included a side-by-side comparison for your pleasure.
We will see how things go when I install it.
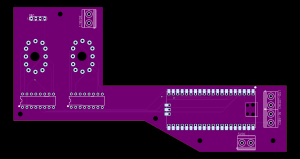

New Board
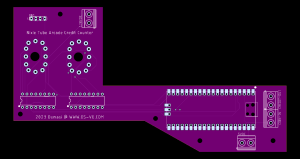

Old Board
]]>
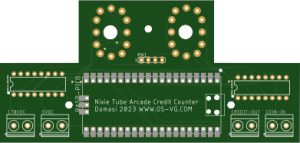
From prototype to printed circuit https://www.os-vg.com/?p=64 Tue, 14 Feb 2023 20:46:55 +0000 http://www.os-vg.com/?p=64 Howdy folks, as you can tell from the prototype from the previous post, all the software and hardware setup is complete. the circuit worked many times over and over without any errors. I have only ever made one circuit board and honestly, that was more a showpiece than an actual circuit but this time I decided to read up on a few pages and after searching for a day or two I managed to find two programs that seemed to work well. One was Kicad which was really intuitive and full of features that I might use in the future. The other was Eagle by Autodesk. This program was complicated but had a few tools that made 80% of the process I needed for this project automated. Either one could have been good but I decided to use both as one can import the other and both can export Gerber files which is what I needed to get my board physically made. Here is the rendering of the board.


The Credit buttons are on the sides next to the Nixie tubes so I had to make spaces on each side. There is also the fact that the Nixies are in reverse since I wanted to flush mount the nixie tubes, so I decided to have all the components except them on the other side.
I will get specs for the space and verify that the board will fit in but so far they look good enough to fit in there. Should have this up and running real soon and then another item on the list is taken care of. Enjoy.

]]>
Some Progress on the Arcade’s Nixie Credit Counter https://www.os-vg.com/?p=60 Mon, 06 Feb 2023 14:09:07 +0000 http://www.os-vg.com/?p=60 So I started working on the circuit for the Nixie Credit system for my arcade. The idea came when I was designing the arcade and wanted to let the kids/grandkids get the real feel of putting tokens into it. When I installed the system to accept tokens though, I noticed that Mame would not remember how many tokens or credits were in that game if they decided to exit and select another. Having a separate system outside of Mame seemed the best solution and while segment LEDs were nice, I had a few tubes left over from working on a Nixie clock. I felt that this would add a sense of rustic enjoyment and a unique talk piece.

Fast forward a few years and I decided to actually give it a swing. Originally I found a hat for an Audrino but the hat was not ideal as it would give false signals and accept interference that would make it work intermittently. This attempt came with a big change or using the Raspberry Pico which was broader in capabilities as well as gave me wireless capabilities so I can adjust between credit and free play without physically making adjustments.

At this point, I have prototyped the circuit and will be working on getting drawings done to have it printed. Once done, I will add updates here.

Here is a video of the final prototype working. The Youtube channel has more testing videos of various components as they were made. Feel free to check them out as well.

Create and Enjoy

]]>